


SAP HANA Studio (Eclipse) SDA source system creation using SQL
When working with SAP BW on HANA, you probably use the capabilities of SDA (Smart Data Access) to connect to various non-SAP sources, like a SQL database or Odata-feed. The creation or maintenance of these source systems is done in SAP HANA Studio or Eclipse.
However, the creation of a source system in HANA Studio is not possible anymore. When you try to create a source system, errors are presented while trying to save it. The details are given in SAP note 3167432. Since HANA Studio is depreciated, there will probably be no fix in HANA Studio. Also looking at the statement of direction given in august ‘23, cloud is the way forward for SAP. This is another hint telling you to look at other solutions. SAP states in the note that there are 2 possible solutions. The first is to move away from HANA Studio (Eclipse) and move to the SAP HANA Cockpit. It will require effort to get this running. The other solution is using a SQL command to create a source system. On this last solution I would like to support you by providing more details in this blog.
Using the SQL console in Eclipse, you can execute the SQL command to generate the new source system. The SQL command is CREATE REMOTE SOURCE. But how do you get the connection details in? In its most rudimental form, the SQL command is this:

Using an example, I would like to demonstrate how this statement can be used. Basically, what you will try to run is a piece of XML within the SQL code in which you can incorporate the essential information, like where is this source located, what is the name of the database etc. This is done in the adapter clause. In the credential clause you put the security details like the information of a Kerberos configuration. Or like in my example, the username and password. But first we will start with the remote source name. The remote source name is there just to give the basic information like the name of the source system. The line will be like this:
CREATE REMOTE SOURCE "TEST_CAMEL" ADAPTER "CamelJdbcAdapter" AT LOCATION AGENT "LOCATION"
In the first statement between the brackets, you can give your source system a name of your liking. Then after ADAPTER you provide the adapter that you would like to use. This is the name you can get from the dropdown menu ‘Adapter Name’ when creating a source system in Eclipse. And last you put in the location which you can also find on the same screen in the dropdown menu ‘Source Location’.
For the adapter clause a bit more explanation is needed. Here we will be using an XML format to populate the values. First, every header line needs to be included in the code, the purple lines. In this case the line is called ‘Configuration’ in Eclipse. Then each parameter you want to populate also needs to be included. The parameters that are not mandatory and you do not need, are not required to be included in the XLM.
In the example below I have tried to link the XLM format to the HANA Studio source system creation screen using color. You need to include the following:
- Name, given in cyan color.
- Display caption, given in orange.
- Is required, given without color.
- Value, given in yellow.
In the above order. All the parameters will come from the XLM code within de SQL code you will find below. To display both the caption and the name of the parameters in the HANA Studio source system creation screen, you need to change the display mode on the top right corner.
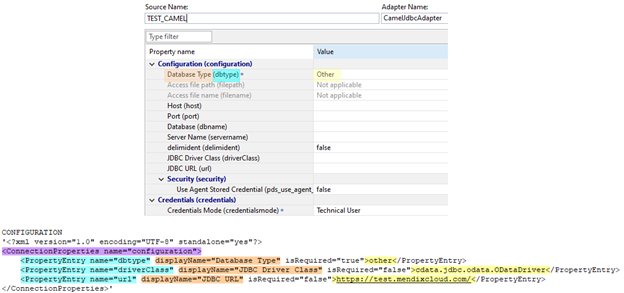
The format in code is like this line below, where the ‘XXXX’ needs to correspond to the HANA Studio source system creation screen. You can indicate by ‘true or ‘false’ if the parameter is mandatory. And the last 4 X’s (yellow) are for the actual value that you would normally input yourself, if you were to create the source system in HANA Studio.
<PropertyEntry name="XXXX" displayName="XXXX" isRequired="XXXX">XXXX/</PropertyEntry>
For my test connection I need 3 parameters, hence the three lines in the code above. For other adapters you might need other parameters, but using the above method you can lookup how to construct the code for your needs.
The last section in the statement, the credential clause, is used for the credentials obviously. In my example I have a username and password combination that is needed for a secure connection. You can also use a credential type of ‘KERBEROS’ for a Kerberos ticket or ‘JWT’ for a JSON Web Token. For my example the code will be like this:
WITH CREDENTIAL TYPE 'PASSWORD' USING
'<CredentialEntry name="db_credential">
<user>TESTUSER</user>
<password>TESTPASSWORD</password>
</CredentialEntry>'
You give the credential type in the first line. And in the 3rd an 4th line you can provide your username and password combination between the > and <. It’s that easy. The credentials are given in the final clause of the CREATE REMOTE SOURCE statement. If we put the three clauses together, the complete statement will look like this:
CREATE REMOTE SOURCE "TEST_CAMEL" ADAPTER "CamelJdbcAdapter" AT LOCATION AGENT "LOCATION"
CONFIGURATION
'<?xml version="1.0" encoding="UTF-8" standalone="yes"?>
<ConnectionProperties name="configuration">
      <PropertyEntry name="dbtype" displayName="Database Type" isRequired="true">other</PropertyEntry>
      <PropertyEntry name="driverClass" displayName="JDBC Driver Class" isRequired="false">cdata.jdbc.odata.ODataDriver</PropertyEntry>
      <PropertyEntry name="url" displayName="JDBC URL" isRequired="false">http://test.mendixcloud.com/</PropertyEntry>
</ConnectionProperties>'
WITH CREDENTIAL TYPE 'PASSWORD' USING
'<CredentialEntry name="db_credential">
<user>TESTUSER</user>
<password>TESTPASSWORD</password>
</CredentialEntry>'
You can run this complete statement in the SQL console in HANA Studio (Eclipse). If the syntax is correct, you will get the following message:
![]()
A good idea is now to open the newly created source system and check if you can create a successful connection to your source. If not, you might need to alter some parameters. Also, good to keep in mind that the user you run the SQL statement with requires the CREATE REMOTE SOURCE privilege.
If you have an existing connection that needs to be modified, you can use the SQL statement ALTER REMOTE SOURCE. But this is for another time.